 NFT Collections")

Today I’ll be super busy preparing the order of a true legend — @Joseinnewworld, who just swept around 58 #NFTs 😳🔥 That’s insane support… looks like I’ll be pulling an all-nighter to get everything ready 😅🙌 #NFT #NFTCollection #NFTCollectors #eCash $XEC #CryptoMevXBOT https://t.co/5iHxVEGjRo pic.twitter.com/xjpvlw34L6
— NFToa (@nftoa_) August 19, 2025
Thank God, thank God, I pray to the presence of Allah SWT who has bestowed His grace, taufiq and guidance. And I continue to bestow my prayers and greetings on the Prophet Muhammad SAW.
This ebook is my first writing about Android Programming. I created this ebook with the aim of being a note for myself and to share with all my friends who are starting to learn Android programming like me.
This ebook contains about layout in android programming. Actually, I made this ebook after I practiced the video tutorial about Layout made by Luh Putu Prapita that I found on youtube. Thank you to Luh Putu Prapita for making a video tutorial about Layout so that it makes it easier for me to start learning android programming.
I hope this ebook can be of benefit to me and also to all my friends and the general public who read this ebook.
This ebook only discusses layout. The layouts discussed in this ebook are:
- Liner Layout
- Relative Layout
- Absolute Layout
- Table Layout
Tools Required
To be able to practice the contents of this ebook, you need a tool that can be used to create Android applications, namely Eclipse IDE or others, ADT and SDK. The tools I use are as follows:
- Linux Mint 16 XFCE (OS)
- Eclipse IDE 4.2 Kepler
- Android SDK r22.3
- ADT
Here I do not explain the installation steps of all these tools. And also I do not explain how to create a project. You can find all of that on the internet easily. Here I only provide the interface and source code.
Introduction
The basic unit of an android application is activity. This activity functions to display the user interface (UI) which can contain several widgets such as TextView, Button, EditText and others. In one android application, there can be more than one activity depending on how many activities the programmer wants to provide.
1. Linear Layout
In Linear Layout an activity is considered one row and one column. So when we add widgets will be placed sequentially according to the linear layout orientation. Linear layout orientation can be vertical and horizontal. For more details let's discuss one by one.
1.a Vertical Linear Layout
As explained above, the widgets that we add to the linear layout will be placed sequentially because the linear layout is considered one row and one column. In the vertical linear layout, the widgets that we add will be sorted from top to bottom. Please pay attention to the image below:

1.a Vertical Linear Layout
In the image above, there are 5 widgets, namely TextView, two EditTexts and two Buttons. The five widgets are arranged vertically. To make it like the image above, please type the following program code:
<LinearLayout xmlns:android="http://schemas.android.com/apk/res/android"
 xmlns:tools="http://schemas.android.com/tools
 android:layout_width="fill_parent"
 android:layout_height="fill_parent"
 android:orientation="vertical">

 <TextView
  android:layout_width="fill_parent"
  android:layout_height="wrap_content"
  android:text="Linear_Layout_Vertical"
  android:gravity="center"
  android:textSize="20sp"/>

 <EditText>
 android:layout_width="fill_parent"
 android:layout_height="wrap_content"
 android:hint="User_Name"/>

 <EditText>
 android:layout_width="fill_parent"
 android:layout_height="wrap_content"
 android:hint="Password"/>

 <Button
  android:layout_width="wrap_content"
  android:layout_height="wrap_content"
  android:text="Login" />

 <Button
  android:id="@+id/btnLogin"
  android:layout_width="wrap_content"
  android:layout_height="wrap_content"
  android:text="Login"
  android:layout_below="@id/passwd"
  android:layout_toLeftOf="@id/btnCancel"/>

</LinearLayout>
For more details, please add another widget. And pay attention to the location of the widget you added.
1.b Linear Layout Horizontal
Horizontal linear layout is the opposite of vertical linear layout. In this horizontal linear layout, the widgets we add will be sorted from left to right. Please pay attention to the image below:

1.b Linear Layout Horizontal
In the image above I added 3 Button widgets, where the 3 button widgets are arranged horizontally from left to right because the orientation used in the linear layout is horizontal. To make it like the image above, please type the following program code:
<LinearLayout xmlns:android="http://schemas.android.com/apk/res/android"
 xmlns:tools="http://schemas.android.com/tools
 android:layout_width="fill_parent"
 android:layout_height="fill_parent"
 android:orientation="horizontal">

 <Button
  android:layout_width="wrap_content"
  android:layout_height="wrap_content"
  android:text="Login" />

 <Button
  android:layout_width="wrap_content"
  android:layout_height="wrap_content"
  android:text="Cancel" />

 <Button
  android:layout_width="wrap_content"
  android:layout_height="wrap_content"
  android:text="Exit" />

</LinearLayout>
Please add another widget and pay attention to the position of the widget you added.
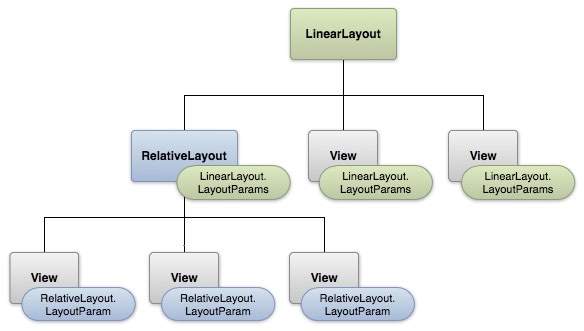
2. Relative Layout
Relative Layout is very different from linear layout. In relative layout we can arrange the layout of a widget based on other widgets. Please see the image below:

2. Relative Layout
In the image above there are 4 widgets. 2 EditText widgets and 2 Button widgets. The EditText password widget is placed under the EditText User Name widget, the Button Cancel widget is placed under the password widget and on the right. While the Login button widget is placed under the EditText password and on the left of the Cancel button. So, in this relative layout we arrange the layout of a widget based on another widget. To make it like the image above, please type the following program code:
<RelativeLayout xmlns:android="http://schemas.android.com/apk/res/android"
 xmlns:tools="http://schemas.android.com/tools
 android:layout_width="fill_parent"
 android:layout_height="fill_parent"
 android:orientation="vertical">

 <TextView
  android:id="@+id/user"
  android:layout_width="fill_parent"
  android:layout_height="wrap_content"
  android:hint="User_Name"/>

 <TextView
  android:id="@+id/passwd"
  android:layout_width="fill_parent"
  android:layout_height="wrap_content"
  android:hint="Password"
  android:layout_below="@id/user"/>

 <Button
  android:id="@+id/btnCancel"
  android:layout_width="wrap_content"
  android:layout_height="wrap_content"
  android:text="Cancel"
  android:layout_below="@id/passwd"
  android:layout_alignParentRight="true"/>

 <Button
  android:id="@+id/btnLogin"
  android:layout_width="wrap_content"
  android:layout_height="wrap_content"
  android:text="Login"
  android:layout_below="@id/passwd"
  android:layout_toLeftOf="@id/btnCancel"/>

</RelativeLayout>
Please modify the code above so that you can understand it better. And please add other widgets and please arrange the layout according to your wishes.
3. Absolute Layout
In this Relative Layout we arrange the layout of a widget based on the x and y coordinates. Please pay attention to the image below:

3. Absolute Layout
The widgets above are arranged based on x and y coordinates. For more details, please type and run the following program code:
<AbsLayoutLayout xmlns:android="http://schemas.android.com/apk/res/android"
 xmlns:tools="http://schemas.android.com/tools
 android:layout_width="fill_parent"
 android:layout_height="fill_parent"
 android:orientation="vertical">

 <TextView
  android:layout_width="wrap_content"  android:layout_height="wrap_content"
  android:text="Absolut_Layout"
  android:textSize="20sp"
  android:layout_x="50dp"
  android:layout_y="75dp"/>

 <Button
  android:layout_width="wrap_content"  android:layout_height="wrap_content"
  android:text="Button_Satu"
  android:layout_x="20dp"
  android:layout_y="120dp"/>

 <Button
  android:layout_width="wrap_content"  android:layout_height="wrap_content"
  android:text="Button_Dua"
  android:layout_x="60dp"
  android:layout_y="170dp"/>

 <Button
  android:layout_width="wrap_content"  android:layout_height="wrap_content"
  android:text="Button_Tiga"
  android:layout_x="100dp"
  android:layout_y="220dp"/>

</AbsLayoutLayout>
Please modify the code above and please add other widgets and set them according to the x and y coordinates as you wish.
4. Table Layout
Table Layout is different from Linear Layout. In Linear Layout, an activity is considered one row and one column. But in table layout, we can define several rows and several columns. Please pay attention to the image below:

4. Table Layout
In the image above, it may only look like there are 5 widgets. But actually in the image above there are 6 widgets. Because before the Submit button widget there is 1 empty TextView widget. Why is there still 1 empty TextView widget? Because if it is not given an empty TextView, the display will be like the following image:
So actually the empty TextView is only used as display manipulation to make it look neater and more beautiful. So that you understand better, please type and run the following program code:
<TableLayout xmlns:android="http://schemas.android.com/apk/res/android"
 xmlns:tools="http://schemas.android.com/tools
 android:layout_width="fill_parent"
 android:layout_height="fill_parent">

<TableRow
  android:layout_width="fill_parent"
  android:layout_height="wrap_content">

 <TextView
  android:layout_width="wrap_content"
  android:layout_height="wrap_content"
  android:text="Nama: "/>

 <EditText
  android:inputType="text"
  android:layout_width="230dp"
  android:layout_height="wrap_content"/>
</TableRow>

<TableRow
  android:layout_width="fill_parent"
  android:layout_height="wrap_content">

 <TextView
  android:layout_width="wrap_content"
  android:layout_height="wrap_content"
  android:text="Alamat: "/>

 <EditText
  android:inputType="text"
  android:layout_width="230dp"
  android:layout_height="wrap_content"/>
</TableRow>

<TableRow
  android:layout_width="fill_parent"
  android:layout_height="wrap_content">

 <TextView
  android:layout_width="wrap_content"
  android:layout_height="wrap_content"
  android:text=""/>

 <Button
  android:layout_width="wrap_content"
  android:layout_height="wrap_content"
  android:text="Submit"/>
</TableRow>

</TableLayout>
You need to note that every time we want to add a widget to the table layout we must add TableRow first. After that, you add another widget in the TableRow widget so that in this TableRow several fields are formed that look like columns. Please modify the program code above and please add another widget so that you can understand it better.
Closing
That's all from me, hopefully this ebook can help and can be our reference in starting to learn android programming. Hopefully I can make the next ebooks even though the contents of the ebook are very simple. I really hope for criticism and suggestions from readers in order to improve the existing deficiencies. You can send criticism and suggestions through my contact.