 NFT Collections")

🔥 Huge shoutout to @SVDG_XEC the absolute legend who just swept through my #NFT collection like a storm! 🙌
— Gaexe (@gaexe_) May 30, 2025
Your support isn’t just noticed — it’s legendary. You didn’t just collect — you made history. 🚀
Looks like I’ll be pulling an all-nighter tonight.👨💻🌙 #NFTCollector $XEC pic.twitter.com/vKwKByk7fi
Scenario
The scenario that will be used in this module is more or less the same as the material that we have learned before, only this time the player can use his mouse to play and every time the mouse is clicked on an object, a sound will be heard. This game will animate 3 types of insect objects that have different colors, namely red, yellow, and brown. In addition, several stone objects will be added. If one of the Insect objects collides with the Stone, the Insect object will rotate.
The player's task is to kill all the red insects. Every time you can kill a red insect, the player gets a point, otherwise, the player's score will be minus. The game will be over if the player's score is below 0.
Creating a World
Based on our scenario, we will first create a World containing a grass image. Create a new scenario first, and name it according to your taste, for example Grass. Then from the World item, right-click and select New subclass... Enter the name Grass as our World, and select the grass.jpg image that has been provided. To insert the grass.jpg image into the scenario, you can do it in two ways:
- selecting an image from the Import from file... button when you create a new World, or
- duplicate the image file to the images folder in your scenario folder.
The source code generated from the Greenfoot template for creating this new world is as follows:
public class Rumput etends World{
    public Rumput(){
        super(600, 400, 1);
    }
}
We will use the world size as in the template. With the super() declaration, it means that for each movement of the actor object, a unit of 1 pixel will be applied, with a width limit of 600 pixels and a height of 400 pixels.
Making Stone
Next we will create a new actor that will represent the stone object. To create a new Actor, we must do it by creating a derived class of Actor. Right click on the Actor item, then select New subclass... Name the class with Stone and provide the available stone.png image.
Making Insects
Similar to creating a Batu actor class, to create an insect actor we will create it with an Insect class first as the parent class for all red insect, yellow insect, and brown insect actor classes. This Insect class will provide general functions that can be performed by insects, such as moving and rotating.
How to create it: on the Actor item, right-click, and select New subclass... Enter the name Insect as the class name and without an image. Then right-click on the Insect class item, select New subclass... and enter the name Red Insect, and select the image insect_red.png. Likewise for Yellow Insect and Brown Insect. Figure 1 shows the results of the class declaration.
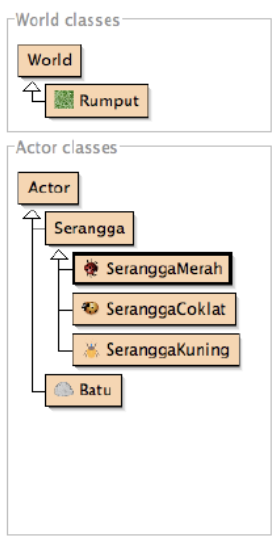
Figure 1. Class World and Actor Structure
Next, we will define two functions for the Insect class, namely move and rotate. You can type the program code below in the Insect class:
/* * disadur dari class Animal Greenfoot book */ public void pindah(double kecepatan) {
    double sudut = Math.toRadians( getRotation() );

    int posx = (int)Math.round(getX() + Math.cos(sudut) * kecepatan);
int posy = (int)Math.round(getY() + Math.sin(sudut) * kecepatan);
setLocation(posx, posy);
}

/* * disadur dari class Animal Greenfoot book */
public void putar(int sudut) {
    setRotation(getRotation() + sudut);
}
In the move() function, the current rotation angle of the Insect object will first be changed to radians1. Using the triangle representation (Figure 2), we can determine the next x, y displacement position according to the current rotation angle.

Figure 2. Trigonometry
So to get the new x and y coordinate values we can apply the following simple command:
int posx = (int)Math.round(getX() + Math.cos(sudut) * kecepatan);
int posy = (int)Math.round(getY() + Math.sin(sudut) * kecepatan);
We use the speed variable as a factor in the distance resulting from the cos() or sin() value. So if you want the Insect object to move faster, then the speed can be given a larger value. Then, we also need a function that can be used to detect whether an Insect actor object reaches the World boundary or not. For that we can use the following function:
/** memodifikasi dari class Animal Greenfoot book **/

public boolean batasWorld(GreenfootImage img) {

int wImg = img.getWidth();
int hImg = img.getHeight();

if(getX() < wImg II getX() > getWorld().getWidth() - wImg) return true;
if(getY() < hImg II getY() > getWorld().getHeight() - hImg) return true;
else return false;

}
Next we also provide a function that can be used to detect objects around the Insect actor object. For example, we will use this function to detect whether there is a stone in front of it or not. Here is an example of the detector function declaration:
public boolean isBersinggungan(int jarak, Class class){
    java.util.List actor = getNeighbours(jarak, false, class);
    return actor.size() > 0;
}
With the method getNeighbours() we can check whether at a distance of ?6F6@ pixels in front, behind, left, or right is there a Class object. If there is, then this method will return a List object from the Actor. If there is no object that is conditioned to collide or not, then the method getNeighbours() will return an empty List.
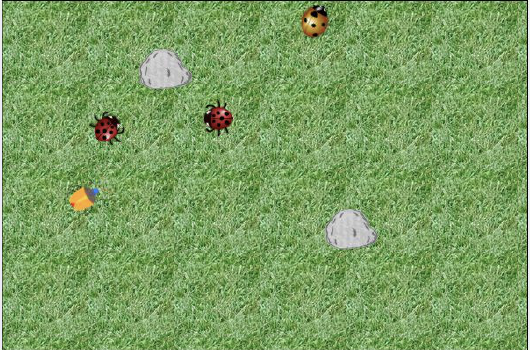
Figure 3. Example of execution results with 3 Insect child objects.
Object Array Implementation
Now we will try to define some YellowInsect and BrownInsect objects when World starts. To do this, we must first override the started() function on the Rumput class which is derived from World.
public void started(){
    //todo something
}
In the method, we will define 4 Yellow Insect objects and 5 Brown Insect objects, each of which is contained in a List collection object. To do this, we first declare two attributes of the Grass class as follows:
private SeranggaCoklat[] coklat;
private SeranggaKuning[] kuning;
Then inside the method started(); we declare all the required YellowInsect and BrownInsect objects and place them in random positions without checking whether they overlap or not:
public void started() {
    coklat = new SeranggaCoklat[5];
    kuning = new SeranggaKuning[4];

    coklat[0] = new SeranggaCoklat();
    coklat[1] = new SeranggaCoklat();
    coklat[2] = new SeranggaCoklat();
    coklat[3] = new SeranggaCoklat();
    coklat[4] = new SeranggaCoklat();

    kuning[0] = new SeranggaKuning();
    kuning[1] = new SeranggaKuning();
    kuning[2] = new SeranggaKuning();
    kuning[3] = new SeranggaKuning();

for(int i=0;
    i < coklat.length;
    i++) { int x = Greenfoot.getRandomNumber(getWidth());
    int y = Greenfoot.getRandomNumber(getHeight());
    addObject(coklat[i], x, y);
}

for(int i=0;
    i < kuning.length;
    i++) { int x = Greenfoot.getRandomNumber(getWidth());
    int y = Greenfoot.getRandomNumber(getHeight());
    addObject(kuning[i], x, y);
}

}
Next we will also add a command to remove all BrownInsect and YellowInsect objects in the stopped() following function declaration:
public void stopped(){
    for(int i=0; i < coklat.length; i++){
        removeObject(coklat[i]);
    }

    for(int i=0; i < kuning.length; i++){
        removeObject(kuning[i]);
    }
}
Spawns Red Insects randomly
In this section we will start to spawn Red Insect objects alternately until they reach the maximum number in one of our Grass worlds. For example, we determine that the maximum number of Red Insects that appear is 4, then we can do it in the following way (this is just an example of an algorithm, if you have another one please apply it):
- declare method
act()on Grass: - Check whether the number of SeranggaMerah objects is maximum? Since SeranggaMerah objects are not contained in an array, we can find out the number of SeranggaMerah, we can call a function
getObjects(Class class)that returns an objectjava.util.List - If it is not yet maximum, do: a). check whether the random value with a limit of 1000 is more than 990? b). if so, add a new RedInsect object to the Grass with random coordinates.
Try applying the algorithm to Rumput() yourself. In the method stopped() , of course, we also add program code to remove all SeranggaMerah objects. Here is an example of the code:
java.util.List merah = getObjects(SeranggaMerah.class);

for(int i=0; i < merah.size(); i++){
    removeObject((SeranggaMerah)merah.get(i));
}
Detecting MouseGreenfoot is also equipped with a function that can help us to detect the position and mouse button clicked by the user. With this function, it becomes easier for us to detect the mouse for our game. All methods for detecting mouse activity are included in the Greenfoot class. Here are some of these methods:
mouseClicked(java.lang.Object)will return true if the position of the mouse click hits the object entered as a parameter.mouseDragged(java.lang.Object)will return true if the object entered in the parameter is dragged by the user.mouseDragEnded(java.lang.Object)will return true if the drag operation completed on the actor object that previously started the drag operation.mouseMoved(java.lang.Object)will return true if the mouse pointer passes over the object.mousePressed(java.lang.Object)will return true if there is a change in status from not pressed to pressed at the object's position.getMouseInfo()will return an object from the MouseInfo class which is the last status of the previous mouse operation. If there is no previous operation, then this function will return a null value. In the MouseInfo class there are several useful methods, including:getActor(),getButton(),getClickCount(),getX(),getY().
As a note: all the mouse functions above, except getMouseInfo(), if the parameter contains null, then the mouse detection function will be performed for all areas and objects in the World.
According to the scenario that we have written at the beginning of this module, now we will declare mouse click detection for the SeranggaMerah actor. To implement this, in the act() method of the SeranggaMerah class we add the following declaration.
if (Greenfoot.mouseClicked(this)){
    getWorld().removeObject(this);
    if (Greenfoot.getRandomNumber(1000) > 990){
        addedToWorld(getWorld());
    }
}
Playing sound filesThe last module is playing sound files in our game. Once again the Greenfoot framework already provides a function for this. To be able to play sound files, all sound files are placed in the sounds subfolder, and should use the format .wav (raw format), .aiff, au, mp3, or midi. Furthermore, Greenfoot has provided a special class, namely GreenfootSound to handle this. The GreenfootSound class has one constructor:
GreenfootSound(String nmfilesound)After we get a GreenfootSound new object, we can then play it by calling the method play(). Sound can also be stopped or paused by calling the stop() and function pause(). Sound can also be played repeatedly by calling the function playLoop(). If you need to test whether the current sound object is playing a sound file, you can check it by using the method isPlaying().
For example, there is a sound file named slurp.wav in the sounds subfolder. We will play this sound file every time SeranggaRed is clicked. In addition, it will play the sound file pop.wav if SeranggaYellow and SeranggaBrown are clicked. Here is an example of the program code for SeranggaRed written in the act() function to complete the previous mouse click checking code.
if (Greenfoot.mouseClicked(this)){
    GreenfootSound snd = new GreenfootSound("slurp.wav");
    snd.play();
    getWorld().removeObject(this);
    Rumput.skor++;

    if (Greenfoot.getRandomNumber(1000) > 990){
        addedToWorld(getWorld());
    }
}
Meanwhile, for the act() method, both the SeranggaKuning and SeranggaCoklat classes can contain code to play sound files as follows.
if (Greenfoot.mouseClicked(this)){
    GreenfootSound snd = new GreenfootSound("pop.wav");
    snd.play();
}
Done!
Source
Object Oriented Programming Practicum, Even Semester, Academic Year 2010/2011, by Budi Susanto, S.Kom., MT, IT UKDW Yogyakarta, Copyright © 2011 belongs to the author.