 NFT Collections")

@Joseinnewworld did it again 😳 Just yesterday he went on an #NFT rampage — and today he’s back for more. Legend. Massive thanks for the wild support, bro 🙏🔥 #NFTfam #eCash $XEC https://t.co/CRXA7XMJHO pic.twitter.com/Bdc3uSK2Y4
— NFToa (@nftoa_) June 20, 2025
There is a widget for the ActionBar called 'SearchView'. When not in use, it will look like this
 And when it is in use, it will look like this:
 Well, the problem is, I really want the ActionBar search menu to immediately display the SearchView Widget when clicked on it while it is in use or in other words, the cursor is focused.
I have tried this way but it still doesn't work.
SearchView searchView = (SearchView) menu.findItem(R.id.menu_search).getActionView();
    searchView.setOnQueryTextListener(this);

    searchView.performClick();
    searchView.requestFocus();
Here is my SearchView widget setup.
<item android:id="@+id/menu_search"
      android:title="Search"
      android:icon="@drawable/ic_action_search"
      android:showAsAction="ifRoom|collapseActionView"
      android:actionViewClass="android.widget.SearchView" />
Solution
To expand the SearchView as you intended (in use or in focused), simply use this method.
searchView.setIconified(false);Then collapse it in this way.
searchView.setIconified(true);You need to change the value android: showAsAction from ifRoom | collapseActionView to always. The SearchView attribute android: iconifiedByDefault must be true, which is the default value, otherwise the user cannot collapse the SearchView after it has been expanded programmatically.
SearchView Implementation Example
On Android, the SearchView widget provides a search user interface where users can enter a search query and then send the request to a search provider. It displays a list of suggestions or query results if available and allows the user to select a suggestion or result to launch.
Example
<SearchView
android:id="@+id/simpleSearchView"
android:layout_width="wrap_content"
android:layout_height="wrap_content" />
Let's discuss some important SearchView methods that might be used to manage search views.
1. getQuery()
This function is used to get the current query string in the search view text field. This method returns a value of type CharSequence. Below we are getting the query String from the search view.
SearchView simpleSearchView = (SearchView) findViewById(R.id.simpleSearchView); // inititate a search view
CharSequence query = simpleSearchView.getQuery(); // get the query string currently in the text field
2. getQueryHint()
This function is used to get the hint text to be displayed in the query text field. This method returns a value of type CharSequence.
Below is an example code that gets the hint text that will be displayed in the query text field on the search view.
SearchView simpleSearchView = (SearchView) findViewById(R.id.simpleSearchView); // inititate a search view
CharSequence queryHint = simpleSearchView.getQueryHint(); // get the hint text that will be displayed in the query text field
3. isIconfiedByDefault()
This method returns the default iconic state of the search field. This method returns a Boolean value of true or false. Below we get the default state of the search field.
SearchView simpleSearchView = (SearchView) findViewById(R.id.simpleSearchView); // inititate a search view
boolean isIconfied=simpleSearchView.isIconfiedByDefault(); // checks default iconified state of the search field
4. setIconifiedByDefault(Boolean iconify)
This method is used to set the default or rest state of the search field. In this method we set a Boolean value true or false.
Important Note: When SearchView is used in Action Bar as action view for collapsible menu item, it needs to be set to iconified by default using setIconifiedByDefault(true) function. If you want search field to be always visible, call setIconifiedByDefault(false). true is default value for this function. You can also set iconified from xml by using iconifiedByDefault property to true or false.
Below we set the iconified by default value to false.
SearchView simpleSearchView = (SearchView) findViewById(R.id.simpleSearchView); // inititate a search view
simpleSearchView.setIconifiedByDefault(false);  // set the default or resting state of the search field
5. setQueryHint(CharSequence hint)
This method is used to set the hint text to be displayed in the query text field. This method supports values of type CharSequence. Below we set a query hint for SearchView.
SearchView simpleSearchView = (SearchView) findViewById(R.id.simpleSearchView); // inititate a search view
simpleSearchView.setQueryHint("Search View"); // set the hint text to display in the query text field
6. setOnQueryTextFocusChangeListener(OnFocusChangeListenerlistener)
This listener informs when the focus of the query text field changes. In the code below we demonstrate the use of setOnQueryTextFocusChangeListener() from SearchView.
SearchView simpleSearchView = (SearchView) findViewById(R.id.simpleSearchView); // inititate a search view

// perform set on query text focus change listener event
simpleSearchView.setOnQueryTextFocusChangeListener(new View.OnFocusChangeListener() {
@Override
public void onFocusChange(View v, boolean hasFocus) {
// do something when the focus of the query text field changes
}
});
7. setOnQueryTextListener(OnQueryTextListenerlistener)
This is a user action in SearchView. Below we show the use of setOnQueryTextListener() from the search view.
SearchView simpleSearchView = (SearchView) findViewById(R.id.simpleSearchView); // inititate a search view

// perform set on query text listener event
simpleSearchView.setOnQueryTextListener(new SearchView.OnQueryTextListener() {
@Override
public boolean onQueryTextSubmit(String query) {
// do something on text submit
return false;
}

@Override
public boolean onQueryTextChange(String newText) {
// do something when text changes
return false;
}
});
SearchView Attributes
Now let's discuss some common attributes of search view which helps us to configure it in our layout(xml).
1. Id
The id attribute is used to uniquely identify a search view.
<!--  id of an search view used to uniquely identify it -->
<SearchView
android:id="@+id/simpleSearchView"
android:layout_width="wrap_content"
android:layout_height="wrap_content" />
2. queryHint
This attribute is used to set an optional query hint string to be displayed in empty query fields. The query hint is the same as the hint attribute for edited text. Below we set the query hint of the search view.
<SearchView
    android:id="@+id/simpleSearchView"
    android:layout_width="wrap_content"
    android:layout_height="wrap_content"
    android:iconifiedByDefault="false"
    android:queryHint="Search Here" /><!-- set query string of an search view -->
3. iconifiedByDefault
This search view attribute is used to set the default or resting state of the search field. You can set a Boolean value for this attribute and the default value is true. A true value indicates you can iconize or expand the search view. Below we set a false value for this attribute.
<SearchView
    android:id="@+id/simpleSearchView"
    android:layout_width="wrap_content"
    android:layout_height="wrap_content"
    android:iconifiedByDefault="false"
    android:queryHint="Search here"/> <!-- set iconified by default to false -->
4. background
The background attribute is used to set the background of the search view. You can set a color or drawable in the background of the search view. You can also set the background color in the java class. Below we set the red color for the background of the search view.
<SearchView
    android:id="@+id/simpleSearchView"
    android:layout_width="wrap_content"
    android:layout_height="wrap_content"
    android:iconifiedByDefault="false"
    android:queryHint="Search here"
    android:background="#f00"/><!-- red color for the background of search view -->
Setting SearchView background in Java class
SearchView simpleSearchView=(SearchView)findViewById(R.id.simpleSearchView);
simpleSearchView.setBackgroundColor(Color.RED);
5. padding
The padding attribute is used to set the padding from left, right, top or bottom. paddingRight: sets the padding from the right side of the search view. paddingLeft: sets the padding from the left side of the search view. paddingTop: sets the padding from the top side of the search view. paddingBottom: sets the padding from the bottom side of the search view Padding: sets the padding from all sides of the search view. Below we set a padding of 40dp from all sides of the search view.
<SearchView
    android:id="@+id/simpleSearchView"
    android:layout_width="wrap_content"
    android:layout_height="wrap_content"
    android:iconifiedByDefault="false"
    android:queryHint="Search View"
    android:background="#f00"
    android:padding="40dp"/> <!-- set 40 dp padding from all the sides of a search view -->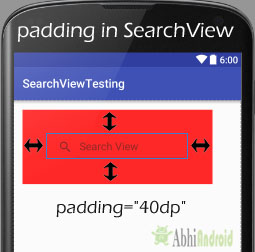
In the SearchView example below, we display a SearchView and a ListView. In this case we create a list of animal names and then set an Adapter to populate the data in the ListView. Finally we implement SearchView.OnQueryTextListener to filter the list of animals by the search query. Below you can download the complete Android Studio SearchView project code, see the final output and a step by step explanation of the example:

1. Kode Layout activity_main
In this step we open the xml file and add code to display SearchView and ListView using different attributes.
<RelativeLayout xmlns:android="http://schemas.android.com/apk/res/android"
    android:layout_width="fill_parent"
    android:layout_height="fill_parent">

    <SearchView
        android:id="@+id/search"
        android:layout_width="fill_parent"
        android:layout_height="wrap_content"
        android:iconifiedByDefault="false">

        <requestFocus />
    </SearchView>

    <ListView
        android:id="@+id/listview"
        android:layout_width="fill_parent"
        android:layout_height="fill_parent"
        android:layout_below="@+id/search" />

</RelativeLayout>
2. MainActivity.java code
In this step we open MainActivity and add code to start SearchView and ListView. In this case we create a list of Animal names and then set the adapter to populate the data in ListView. In this case we also implement SearchView.OnQueryTextListener to filter the list of animals by search query.
package example.abhiandroid.searchviewexample;

import android.os.Bundle;
import android.support.v7.app.AppCompatActivity;
import android.widget.ListView;
import android.widget.SearchView;

import java.util.ArrayList;

public class MainActivity extends AppCompatActivity implements SearchView.OnQueryTextListener {

    // Declare Variables
    ListView list;
    ListViewAdapter adapter;
    SearchView editsearch;
    String[] animalNameList;
    ArrayList<AnimalNames> arraylist = new ArrayList<AnimalNames>();

    @Override
    public void onCreate(Bundle savedInstanceState) {
        super.onCreate(savedInstanceState);
        setContentView(R.layout.activity_main);

        // Generate sample data

        animalNameList = new String[]{"Lion", "Tiger", "Dog",
                "Cat", "Tortoise", "Rat", "Elephant", "Fox",
                "Cow","Donkey","Monkey"};

        // Locate the ListView in listview_main.xml
        list = (ListView) findViewById(R.id.listview);

        for (int i = 0; i < animalNameList.length; i++) {
            AnimalNames animalNames = new AnimalNames(animalNameList[i]);
            // Binds all strings into an array
            arraylist.add(animalNames);
        }

        // Pass results to ListViewAdapter Class
        adapter = new ListViewAdapter(this, arraylist);

        // Binds the Adapter to the ListView
        list.setAdapter(adapter);

        // Locate the EditText in listview_main.xml
        editsearch = (SearchView) findViewById(R.id.search);
        editsearch.setOnQueryTextListener(this);
    }

    @Override
    public boolean onQueryTextSubmit(String query) {

        return false;
    }

    @Override
    public boolean onQueryTextChange(String newText) {
        String text = newText;
        adapter.filter(text);
        return false;
    }
}
3. ListViewAdapter.java code
Now create a New Class. Go to app -> java -> right click on package-> New -> Java Class and create ListViewAdapter.java and add the following code. Here we are extending BaseAdapter in ListViewAdapter class and then setting the data in ListView using Modal class.
package example.abhiandroid.searchviewexample;

import android.content.Context;
import android.view.LayoutInflater;
import android.view.View;
import android.view.ViewGroup;
import android.widget.BaseAdapter;
import android.widget.TextView;
import java.util.ArrayList;
import java.util.List;
import java.util.Locale;

public class ListViewAdapter extends BaseAdapter {

    // Declare Variables

    Context mContext;
    LayoutInflater inflater;
    private List<AnimalNames> animalNamesList = null;
    private ArrayList<AnimalNames> arraylist;

    public ListViewAdapter(Context context, List<AnimalNames> animalNamesList) {
        mContext = context;
        this.animalNamesList = animalNamesList;
        inflater = LayoutInflater.from(mContext);
        this.arraylist = new ArrayList<AnimalNames>();
        this.arraylist.addAll(animalNamesList);
    }

    public class ViewHolder {
        TextView name;
    }

    @Override
    public int getCount() {
        return animalNamesList.size();
    }

    @Override
    public AnimalNames getItem(int position) {
        return animalNamesList.get(position);
    }

    @Override
    public long getItemId(int position) {
        return position;
    }

    public View getView(final int position, View view, ViewGroup parent) {
        final ViewHolder holder;
        if (view == null) {
            holder = new ViewHolder();
            view = inflater.inflate(R.layout.listview_item, null);
            // Locate the TextViews in listview_item.xml
            holder.name = (TextView) view.findViewById(R.id.name);
            view.setTag(holder);
        } else {
            holder = (ViewHolder) view.getTag();
        }
        // Set the results into TextViews
        holder.name.setText(animalNamesList.get(position).getAnimalName());
        return view;
    }

    // Filter Class
    public void filter(String charText) {
        charText = charText.toLowerCase(Locale.getDefault());
        animalNamesList.clear();
        if (charText.length() == 0) {
            animalNamesList.addAll(arraylist);
        } else {
            for (AnimalNames wp : arraylist) {
                if (wp.getAnimalName().toLowerCase(Locale.getDefault()).contains(charText)) {
                    animalNamesList.add(wp);
                }
            }
        }
        notifyDataSetChanged();
    }

}
4. Kode list_view_items.xml
Now Create a new layout Activity. Go to res-> right click on layout -> New -> Activity -> Blank Activity and create list_view_items.xml and add the following code. Here we are creating the item view which will be displayed inside each row.
<RelativeLayout xmlns:android="http://schemas.android.com/apk/res/android"
    android:layout_width="fill_parent"
    android:layout_height="fill_parent"
    android:padding="10dp">

    <TextView
        android:id="@+id/nameLabel"
        android:layout_width="wrap_content"
        android:layout_height="wrap_content"
        android:text="Animal : " />

    <TextView
        android:id="@+id/name"
        android:layout_width="wrap_content"
        android:layout_height="wrap_content"
        android:layout_toRightOf="@+id/nameLabel" />

</RelativeLayout>
5. Code Object AnimalNames.java
Now create a New Class. Go to app -> java -> right click on package-> New -> Java Class and create AnimalNames.java and add the following code. Here we have a constructor to set the animal name and a function to get the animal name.
package example.abhiandroid.searchviewexample;

public class AnimalNames {
    private String animalName;

    public AnimalNames(String animalName) {
        this.animalName = animalName;
    }

    public String getAnimalName() {
        return this.animalName;
    }

}
Now run the App, you will see different Animal names listed. Now type the first character of the Animal that comes to your mind in the SearchView and you will be sorted the list.