 NFT Collections")

The dominance of @Joseinnewworld remains undefeated — he just added 20 more #NFTs to his collection 🔥🐋 A true force in the NFToa ecosystem. Grateful for the relentless support, legend 🙌 #eCash $XEC #NFT #NFTCollection #NFTmarketplace #nftartgallery #Nftarts #CryptoCommunity pic.twitter.com/FgYwdEQJpv
— NFToa (@nftoa_) September 9, 2025
This tutorial is in the name of Wawan Chahyo Nugroho (NIM: 12131294), created in order to fulfill Assignment 4/Final of Mobile Programming Course, supervised by Mr. Untung Subagyo, S.Kom

Android Studio Alert Dialog, Show, Hide & Random
Completion
Step 1:
Open Android Studio
Step 2:
Select New Project >> create a project name of your choice, for example "ShowHide_Random" >> Next.
Step 3:
Select Target Device >> Check Phone and Tablet >> API14: Android 4.0 (IceCreamSandwich) >> Next.
Step 4:
Select Empty Activity, as the main layout >> Customize the Activity & Layout name / (default) >> Finish.
Step 5:
Select the activity_main.xml tab >> Design mode.
Step 6:
Drag & Drop TextView and 4 Buttons to Layout, then adjust their positions as shown in the image below,

Default User Interface
Step 7:
Set properties like text, textSize, and ID for all the above components.
Step 8:
Add a new layout in the res → layout folder, by Right-Clicking the layout folder → New → File, then give it a free name and don't forget to add the *xml extension (name.xml).
Step 9:
Drag & Drop TextView to the new layout, then adjust its position and properties (textSize & Bold).
Step 10:
Adopt the source code below:
package com.gatewan.showhide_random;

import android.content.DialogInterface;
import android.content.SharedPreferences;
import android.os.Bundle;
import android.support.v7.app.AlertDialog;
import android.support.v7.app.AppCompatActivity;
import android.view.View;
import android.widget.Button;
import android.widget.TextView;

import java.util.Random;

public class ShowHide_Random extends AppCompatActivity {

    TextView txt;
    TextView btxt;
    public void tampil(View view){
        txt.setVisibility(View.VISIBLE);
    }
    public void sembunyi(View view){
        txt.setVisibility(View.INVISIBLE);
    }
    public void random(View view){
        int a = new Random().nextInt(10);
        int b = new Random().nextInt(10);

        txt.setText(Integer.toString(a)+" x "+Integer.toString(b)+" = ");
    }
    @Override
    protected void onCreate(Bundle savedInstanceState) {
        super.onCreate(savedInstanceState);
        setContentView(R.layout.activity_show_hide__random); //sesuaikan dengan nama layout utama Anda (layout penuh komponen)
        txt = (TextView) findViewById(R.id.atxt); //id textView di layout utama

        SharedPreferences sp =
                getSharedPreferences("com.gatewan.sharedpreferencesdemo", MODE_PRIVATE);
        SharedPreferences.Editor ed = sp.edit();

        //tulis
        ed.putString("nama ", "Wawan CN ");
        ed.putInt("umur ", 34);
        ed.commit();

        //baca
        String nama = sp.getString("nama", "Tejo");
        int umur = sp.getInt("umur", 0);

        AlertDialog ad = new AlertDialog.Builder(this).create();
        ad.setMessage(" nama " + nama + " umur " + umur);
        ad.show();

        Button exButton = (Button)findViewById(R.id.exit); //id Button Language
        exButton.setOnClickListener(new View.OnClickListener() {

            @Override
            public void onClick(View view){
                AlertDialog.Builder dial = new AlertDialog.Builder(ShowHide_Random.this);
                dial.setIcon(android.R.drawable.ic_dialog_alert);
                dial.setTitle("Language Option");
                dial.setMessage("Choose your language");
                dial.setPositiveButton("Indonesia", new DialogInterface.OnClickListener()
                {
                    @Override
                    public void onClick(DialogInterface
                        dialog, int which) {
                        setContentView(R.layout.test); //sesuaikan dengan nama 2nd layout Anda (layout hanya TextView)
                        btxt = (TextView)findViewById(R.id.txtBahasa); //id textView di 2nd layout
                        btxt.setText("Bahasa Anda Indonesia");

                    }
                });
                dial.setNegativeButton("English", new DialogInterface.OnClickListener()
                        {
                            @Override
                            public void onClick(DialogInterface dialog, int which){
                                setContentView(R.layout.test); //sesuaikan dengan nama 2nd layout Anda (layout hanya TextView)
                                btxt = (TextView)findViewById(R.id.txtBahasa); //id textView di 2nd layout
                                btxt.setText("Your Language is English");
                            }
                        }
                );

                AlertDialog alertDialog = dial.create();
                alertDialog.show();

            }

        });
    }

}
Step 11:
You will see a lot of line errors, so adjust the source code configuration based on your new class naming, component ID and layout naming.
Step 12:
Set the onClick properties for Button Show, Hide and Random, adjust them based on their respective functions. There are options for the show, hide and random methods, you can set the method definition in the source code.
Step 13:
Run your project via AVD. Here is a demo:
Step 14:
It's time to say "Alhamdulillah"
Creating an Alert Dialog in Android Studio
A dialog is a small window that prompts the user to make a decision or enter additional information.
Sometimes in your application, if you want to ask the user about a choice/decision between Yes/No, and stay in the same activity, without changing screens, then you can use Alert Dialog.
To create an Alert Dialog, you need to create an AlertDialogBuilder object which is an inner class of AlertDialog. Here is the syntax:
AlertDialog.Builder alertDialogBuilder = new AlertDialog.Builder(this);Now you have to set the positive (yes) or negative (no) button using the AlertDialogBuilder class object. The syntax is
alertDialogBuilder.setPositiveButton(CharSequence text,
   DialogInterface.OnClickListener listener)
alertDialogBuilder.setNegativeButton(CharSequence text,
   DialogInterface.OnClickListener listener)
Apart from this, you can use other functions provided by the builder class to customize the alert dialog. As listed below.
| Sr.No | Method type & description                                                                                                                                                                                                                                |
|-------|----------------------------------------------------------------------------------------------------------------------------------------------------------------------------------------------------------------------------------------------------------|
| 1     | setIcon(Drawable icon) This method set the icon of the alert dialog box.                                                                                                                                                                                 |
| 2     | setCancelable(boolean cancel able) This method sets the property that the dialog can be cancelled or not                                                                                                                                                 |
| 3     | setMessage(CharSequence message) This method sets the message to be displayed in the alert dialog                                                                                                                                                        |
| 4     | setMultiChoiceItems(CharSequence[] items, boolean[] checkedItems, DialogInterface.OnMultiChoiceClickListener listener) This method sets list of items to be displayed in the dialog as the content. The selected option will be notified by the listener |
| 5     | setOnCancelListener(DialogInterface.OnCancelListener onCancelListener) This method Sets the callback that will be called if the dialog is cancelled.                                                                                                     |
| 6     | setTitle(CharSequence title) This method set the title to be appear in the dialog                                                                                                                                                                        |
After creating and setting up the dialog builder, you will create the alert dialog by calling the create() method of the builder class. The syntax is as follows
AlertDialog alertDialog = alertDialogBuilder.create();
alertDialog.show();
This will create an alert dialog and will display it on the screen.
Dialogue fragment
Before going into an example, we need to know about dialog fragments. A dialog fragment is a fragment that can display fragments in a dialog box.
public class DialogFragment extends DialogFragment {
   @Override
   public Dialog onCreateDialog(Bundle savedInstanceState) {
      // Use the Builder class for convenient dialog construction
      AlertDialog.Builder builder = new AlertDialog.Builder(getActivity());
      builder.setPositiveButton(R.string.fire, new DialogInterface.OnClickListener() {
         public void onClick(DialogInterface dialog, int id) {
            toast.makeText(this,"enter a text here",Toast.LENTH_SHORT).show();
         }
      })
      .setNegativeButton(R.string.cancel, new DialogInterface.OnClickListener() {
         public void onClick(DialogInterface dialog, int id) {
            finish();
         });
         // Create the AlertDialog object and return it
         return builder.create();
      }
   }
}
List of dialogs
This is often used to show a list of items in a dialog box. Suppose the user has to select the list of items.
public Dialog onCreateDialog(Bundle savedInstanceState) {
   AlertDialog.Builder builder = new AlertDialog.Builder(getActivity());
   builder.setTitle(Pick a Color)

   .setItems(R.array.colors_array, new DialogInterface.OnClickListener() {
      public void onClick(DialogInterface dialog, int which) {
         // The 'which' argument contains the index position
         // of the selected item
      }
   });
   return builder.create();
}
Single-choice list dialog
This has been used to add a single choice list to the Dialog box. We can check or uncheck as per user's choice.
public Dialog onCreateDialog(Bundle savedInstanceState) {
   mSelectedItems = new ArrayList();
   AlertDialog.Builder builder = new AlertDialog.Builder(getActivity());

   builder.setTitle("This is list choice dialog box");
   .setMultiChoiceItems(R.array.toppings, null,
      new DialogInterface.OnMultiChoiceClickListener() {
      @Override
      public void onClick(DialogInterface dialog, int which, boolean isChecked) {

         if (isChecked) {
            // If the user checked the item, add it to the selected items
            mSelectedItems.add(which);
         }

         else if (mSelectedItems.contains(which)) {
            // Else, if the item is already in the array, remove it
            mSelectedItems.remove(Integer.valueOf(which));
         }
      }
   })

   // Set the action buttons
   .setPositiveButton(R.string.ok, new DialogInterface.OnClickListener() {
      @Override
      public void onClick(DialogInterface dialog, int id) {
         // User clicked OK, so save the mSelectedItems results somewhere
         // or return them to the component that opened the dialog
         ...
      }
   })

   .setNegativeButton(R.string.cancel, new DialogInterface.OnClickListener() {
      @Override
      public void onClick(DialogInterface dialog, int id) {
         ...
      }
   });
   return builder.create();
}
Example
The following example shows the use of AlertDialog in android.
To experiment with this example, you will need to run this on an emulator or actual device.
| Steps | Description                                                                                                                                         |
|-------|-----------------------------------------------------------------------------------------------------------------------------------------------------|
| 1     | You will use Android studio to create an Android application and name it as My Application under a package com.example.sairamkrishna.myapplication. |
| 2     | Modify src/MainActivity.java file to add alert dialog code to launch the dialog.                                                                    |
| 3     | Modify layout XML file res/layout/activity_main.xml add any GUI component if required.                                                              |
| 4     | No need to change default string constants. Android studio takes care of default strings at values/string.xml                                       |
| 5     | Run the application and choose a running android device and install the application on it and verify the results.                                   |
Here is the modified code from src/MainActivity.java
package com.example.sairamkrishna.myapplication;

import android.app.AlertDialog;
import android.content.DialogInterface;
import android.support.v7.app.ActionBarActivity;
import android.os.Bundle;
import android.view.View;
import android.widget.Toast;

public class MainActivity extends ActionBarActivity {
   @Override
   protected void onCreate(Bundle savedInstanceState) {
      super.onCreate(savedInstanceState);
      setContentView(R.layout.activity_main);
   }

   public void open(View view){
      AlertDialog.Builder alertDialogBuilder = new AlertDialog.Builder(this);
      alertDialogBuilder.setMessage("Are you sure,
         You wanted to make decision");
      alertDialogBuilder.setPositiveButton("yes",
         new DialogInterface.OnClickListener() {
         @Override
         public void onClick(DialogInterface arg0, int arg1) {
            Toast.makeText(MainActivity.this,"You clicked yes
               button",Toast.LENGTH_LONG).show();
         }
      });

      alertDialogBuilder.setNegativeButton("No",new DialogInterface.OnClickListener() {
         Override
         public void onClick(DialogInterface dialog, int which) {
            finish();
         }
      });

      AlertDialog alertDialog = alertDialogBuilder.create();
      alertDialog.show();
   }
}
Here is the modification of res/layout/activity_main.xml code. Below the abc code shows the tutorialspoint logo
<?xml version="1.0" encoding="utf-8"?>
<RelativeLayout
   xmlns:android="http://schemas.android.com/apk/res/android"
   xmlns:tools="http://schemas.android.com/tools" android:layout_width="match_parent"
   android:layout_height="match_parent"
   android:paddingLeft="@dimen/activity_horizontal_margin"
   android:paddingRight="@dimen/activity_horizontal_margin"
   android:paddingTop="@dimen/activity_vertical_margin"
   android:paddingBottom="@dimen/activity_vertical_margin"
   tools:context=".MainActivity">

   <TextView
      android:layout_width="wrap_content"
      android:layout_height="wrap_content"
      android:text="Alert Dialog"
      android:id="@+id/textView"
      android:textSize="35dp"
      android:layout_alignParentTop="true"
      android:layout_centerHorizontal="true" />

   <TextView
      android:layout_width="wrap_content"
      android:layout_height="wrap_content"
      android:text="Tutorialspoint"
      android:id="@+id/textView2"
      android:textColor="#ff3eff0f"
      android:textSize="35dp"
      android:layout_below="@+id/textView"
      android:layout_centerHorizontal="true" />

   <ImageView
      android:layout_width="wrap_content"
      android:layout_height="wrap_content"
      android:id="@+id/imageView"
      android:src="@drawable/abc"
      android:layout_below="@+id/textView2"
      android:layout_alignRight="@+id/textView2"
      android:layout_alignEnd="@+id/textView2"
      android:layout_alignLeft="@+id/textView"
      android:layout_alignStart="@+id/textView" />
   <Button
      android:layout_width="wrap_content"
      android:layout_height="wrap_content"
      android:text="Alert dialog"
      android:id="@+id/button"
      android:layout_below="@+id/imageView"
      android:layout_alignRight="@+id/textView2"
      android:layout_alignEnd="@+id/textView2"
      android:layout_marginTop="42dp"
      android:onClick="open"
      android:layout_alignLeft="@+id/imageView"
      android:layout_alignStart="@+id/imageView" />

</RelativeLayout>
This is Strings.xml
<resources>
    <string name="app_name">My Application</string>
</resources>
Here is the default AndroidManifest.xml code
<?xml version="1.0" encoding="utf-8"?>
<manifest xmlns:android="http://schemas.android.com/apk/res/android"
   package="com.example.sairamkrishna.myapplication" >

   <application
      android:allowBackup="true"
      android:icon="@drawable/ic_launcher"
      android:label="@string/app_name"
      android:theme="@style/AppTheme" >

      <activity
         android:name="com.example.sairamkrishna.myapplication.MainActivity"
         android:label="@string/app_name" >

         <intent-filter>
            <action android:name="android.intent.action.MAIN" />
            <category android:name="android.intent.category.LAUNCHER" />
         </intent-filter>

      </activity>

   </application>
</manifest>
Let’s try running your application. I assume you have connected your actual Android Mobile device with your computer. To run the application from Android studio, open any of your project activity files and click on Run Eclipse Run Icon from the toolbar. Before starting your application, Android studio will show the following window to choose the option where you want to run your Android application.
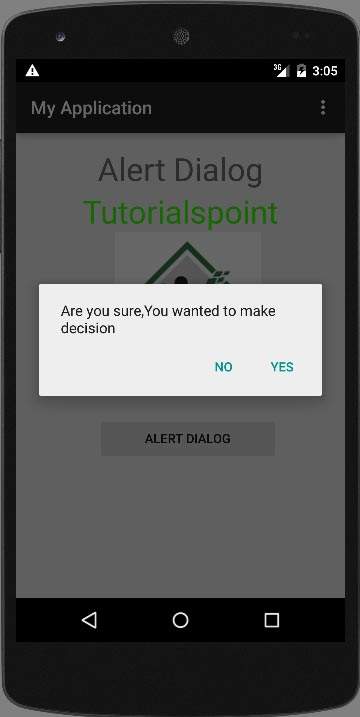
Select your option and then click on it. For example, if you click on the YES button, the result will be as follows
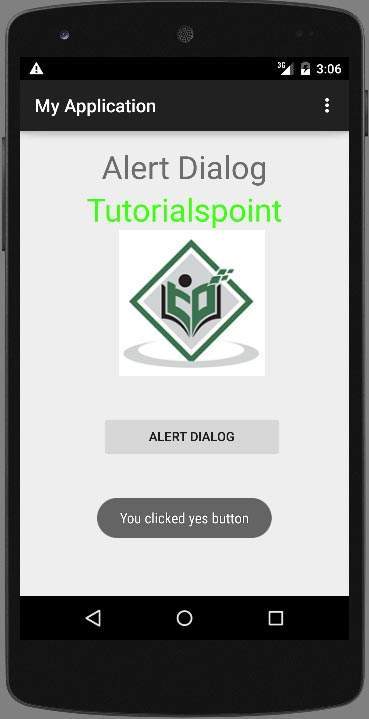
if you click NO button then it calls finish() and it will close your application.